

GitHub: Codespaces
appdev github codespaces console csharp dotnet
Want to make a simple .Net Console app available from its GitHub repository for immediate use without needing to clone it and set it up locally? GitHub Codespaces makes this easy. At issue is who pays for the usage? Also given that an image is created how do they get managed? Read on.
Please leave an UpVote, at the bottom, if you like this thx.
Before you get started, you need a Free or Pro GitHub account. See GitHub Plans and Codespaces below for details.`
About
Reference
Understanding the codespace lifecycle
Codespaces
What it does: A cloud-based development environment that lets you instantly spin up a fully-configured VS Code instance from a GitHub repository directly in your browser. It can be opened in desktop VS Code also.
A Codespaces Button to a GitHub Repository ReadMe at djaus2/CreateQr)].
Codespace Lifecycle
Life Cycle of a Codespace
Mermaid
This diagram was created using Mermaid
Codespaces Info
App types
- Codespaces can be used for a variety of application types, including console applications, web applications, libraries, and more. The environment can be customized to suit the needs of different programming languages and frameworks.
- The OS is typical Linux (eg Debian) based unless you specify a different image.
- Whilst you can setup to build a Windows WPF app in that context you can’t run it.
- Simplest is just a headless Console app.
GitHub Plans and Codespaces
- GitHub Codespaces is available to users on various GitHub plans, including Free, Pro, Team, and Enterprise Cloud. Each plan has different features and pricing structures for Codespaces usage.
-*This article assumes that you are a GitHub Free or Pro user.
- If you are part of an organization using GitHub Team or Enterprise Cloud, the billing and management of Codespaces will differ.
- Note also the GitHub Pro Plan is now called GitHub Team Plan for Individuals.
Free Plan
- Cost: $0 USD per month
- 120 hrs per month
- 15GB/month Storage
Team Plan formally GitHub Pro
- Cost: $4 USD per user/month
- 180 hrs per month
- 20GB/month Storage
With the above 2 plans, if you exceed the included hours or storage, additional usage is billed if you have a payment scheme set up. If not you may be restricted from creating new Codespaces until the next billing cycle.
Enterprise Plan
- Cost: Starts at $21 per user/month (custom pricing available)
- GitHub plans for organizations and enterprises do not include a free quota for GitHub Codespaces.
- Configuration/costs/resources determined by enterprise settings
Codespace Images
Codespaces uses containerized development environments, which are defined by “dev container” configurations. These configurations specify the tools, runtimes, and settings needed for your development environment. By default, your codespace is built from the default Linux image, also known as the “default dev container configuration”. This requires a Dockerfile or a devcontainer.json file in your repository to customize the environment. You can also create custom images for your Codespaces.
Creating a Codespace for a Console App
Creating a Codespace for a console app is straightforward. First, ensure your console app is hosted in a GitHub repository. Then, follow these steps:
- Navigate to your repository on GitHub.
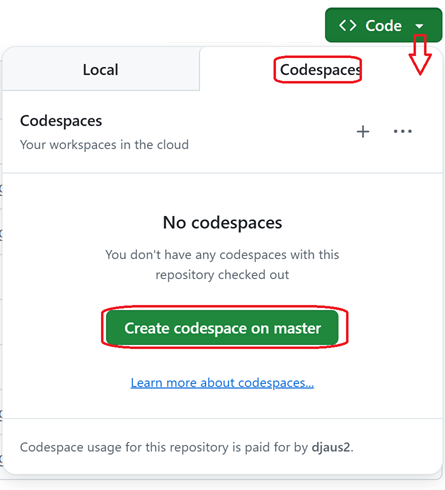
- Click on the green
[<> Code]button and select the “Codespaces” tab- Click on the
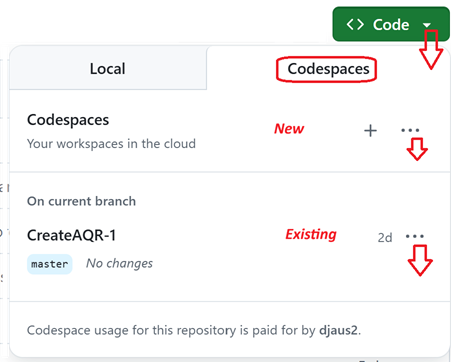
[Create codespace]on master button - If previous Codepsace was created, Click on the “+” symbol to create a new Codespace instance on the Master Branch.
- Or click on the ellipsis (…) to choose a different options.
- You can also reopen any previously created Codespaces from this tab.
- Click on the
- GitHub will automatically set up the environment based on the repository’s configuration files (like
.devcontainer.jsonif present). - Once the Codespace is ready, you can run your console app directly from the integrated terminal.
.
Tap and rotate phone to enlarge.
The dialog for starting creating a a new Codespace from a repository with no previous Codespace
Tap and rotate phone to enlarge.
The dialog for starting opening an existing Codespace or for creating a a new one from a repository with a previous Codespace
Alternative Way to Create a Codespace
- Alternatively there may be an
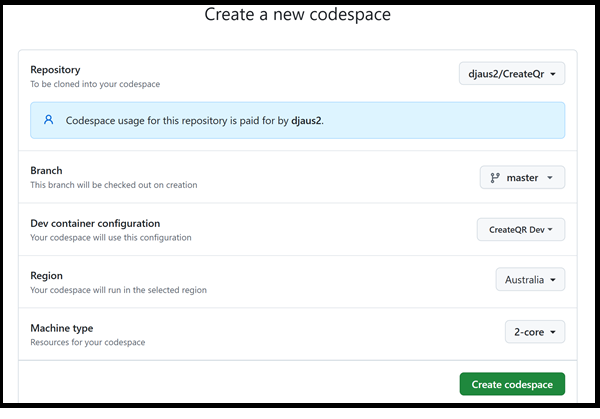
[Open in GitHub Codespaces]button in its ReadMe if the repository owner has added one- Click on the button to launch a new Codespace for the selected repository.
- The repository should show in button top right. You can select another.
- Select the Branch if not Main, the Machine Type 2/4/8/16 Core .. 2 should be enough for a Console app
- 2/4 cores are options for Free Plan users, 2/4/6/8 cores are Pro/Team users’ options.

Tap and rotate phone to enlarge.
Tap and rotate phone to enlarge.
The dialog from using the (alt) approach where the repository owner has added a Codespaces button.
Third approach
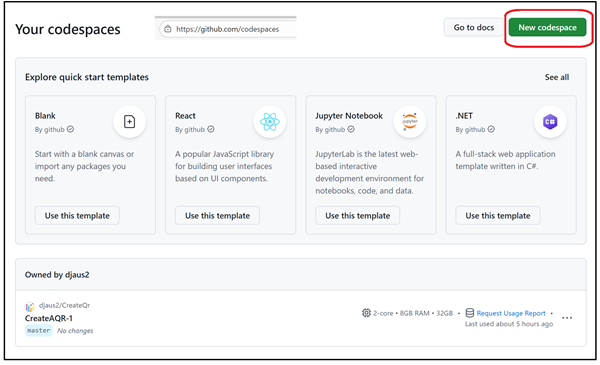
- Go to https://github.com/codespaces
- You can create a new Codespace image
- Or open (your) existing one from there.
- For example the existing Codespace for this user is listed at the bottom of the dialog below.
Tap and rotate phone to enlarge.
The dialog https://github.com/codespaces
Managing Costs and Usage
When using GitHub Codespaces, it’s important to understand the cost implications. Codespaces usage is billed based on the compute and storage resources consumed. Here are some key points to consider:
- Billing Responsibility: The owner of the repository typically bears the cost of Codespaces usage. However, if you’re using a personal account, the end user is responsible for the charges incurred.
- Resource Limits: GitHub provides different plans with varying resource limits. Be sure to monitor your usage to avoid unexpected charges.
Running the Console App in the Codespace
Once your Codespace is set up, you can run your console app directly from the integrated terminal. The terminal is a Web version of VS Code,
- Note that the Codespace can also be launched in desktop VS Code.
- Take the third option above.
- When presented with your existing Codespace (not in the repository) click on the ellipsis
...and selectOpen in VS Code.
Commands
From a Terminal in Codespace in the root of the app:
Commands to build and run a .NET Console App
dotnet build-
dotnet runDefaults to Debug configuration, Is a build then run dotnet run -c ReleaseIs a build then run in Release configurationdotnet run -c Debugdotnet run --no-buildRuns without building firstdotnet clean
Hint
As the default image is Debian (Linux) then if writing to a file, suggest writing to /tmp or folder there in. Treating the app as headless, if you add /tmp to the menu you can view and download any generated files.
- Right-Click in Explorer in blank area toward bottom
- Select
Add Folder to Workspace... - Enter
/tmpand clickAdd
Given though that many temporary files are located in
/tmpit may be better to create a subfolder in/tmpfor your app to write to and select that in the first place.
Editing the Codespace
You can edit the code directly in the Codespace using the integrated editor. Any changes you make can be committed and pushed back to the GitHub repository. If you edit the code then you would need to do another build before running the code again.
Saving and Closing the Codespace
When you’re done working in the Codespace, you can simply close the browser tab or window. The Codespace will be saved automatically, and you can reopen it later to continue working. The Codespace will have a timeout period of inactivity after which it will be stopped to save resources. This period defaults to 30 minutes but that can be changed.
- Closing a Codespace Simply close the browser tab or window.
- The Codespace is saved automatically.
- It will stop after the timeout period.
- Stopping a closed Codespace Go to https://github.com/codespaces and click on the ellipsis (…) next to the Codespace and select
Stop Codespace.- This halts compute but preserves the environment (container, disk, changes).
- Nb: It will stop after the timeout period.
- Delete a Codespace Same but select
Delete Codespace.- Deletes the VM and disk; any unsynced changes not pushed to Git will be lost.
- Useful to avoid ongoing storage/retention costs. -
- Committing a Codespace
- Any changes made in the Codespace can be committed and pushed to the GitHub repository using the integrated Git tools in VS Code.
Settings:
Timeout period
- On GitHub: Profile → Settings → Codespaces → Default idle timeout.
- Choose 5–240 minutes (4 hours), then Save.
Deletion after period
- On GitHub: Profile → Settings → Codespaces → Default retention period.
- Choose 0–30 days and Save.
0 days = delete immediately when the codespace stops or times out.
The countdown resets each time you reconnect; deletion is independent of unpushed changes. (docs.github.com)[docs.github.com]
Addendum: Via VS Code
Setting Up
- Install the GitHub Codespaces Extension in VS Code.
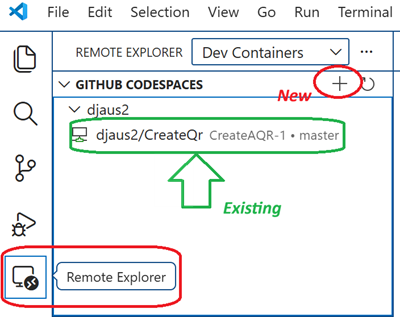
- Click the Remote Explorer icon in the Activity Bar on left.
- Sign into GitHub if not already done.
Creating a Codespace
- In the Remote Explorer, under Codespaces, click the plus (+) icon.
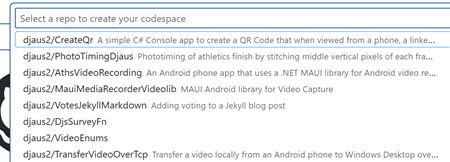
- Select/Enter the repository name (e.g., owner/repo).
- Select the branch you want to work on.
- Choose a dev container configuration if prompted.
- Pick a machine type (CPU/RAM) based on your needs.
Tap and rotate phone to enlarge.
Tap and rotate phone to enlarge.
Opening an Existing Codespace
- In the Remote Explorer, under Codespaces, select your existing codespace.
Example: Opening a codespace from CLI
gh codespace create --repo owner/repo --branch main --machine 4-core
Further: A Blazor Codespace
This post has demonstrated running a headless Console app. Continuing with the headless approach, a Blazor Server app once deposited to GitHub can similarly be run in a Codespace. Just create the project, commit it to GitHub and then create a Codespace as above. When you run the app in the Codespace with dotnet run you will see a port number. Also there will be a button to press, bottom right to launch a browser for the app.
Note that if NAME is the generated or assigned name of the Codespace then:
- https://NAME.github.dev/ is the URL for the Codespace
- https://NAME-5017.app.github.dev is the URL for the Blazor app where, in this case, 5017 is the assigned port.
Try with this https://github.com/djaus2/BlazorAppSvcTest
Simple! 😃
Remember to stop or delete the Codespace when finished to avoid ongoing costs at https://github.com/codespaces
| Topic | Subtopic | |
| Next: > | Markdown | A Script to Paste an Image |
| This Category Links | ||
| Category: | Application Dev Index: | Application Dev |
| Next: > | Checkers-Draughts Game | AI App Dev Style |
| < Prev: | WPF | Sideloading |


