Softata - Adding a new display: 1. The Display Hardware
softata rpipico firmata arduino csharp bme280 grove softatadisplay
An example of adding a display to Softata … The Bargraph Hardware.
It is proposed to add a linear Bargraph display the Softata suite as a display. It is intended that it it conform to the required methods of Softata.Display class as well as having some custom device specific Misc methods.
There is a Grove LED Bar Display that could be used for this purpose. A latter manifestation may include this at a later stage.
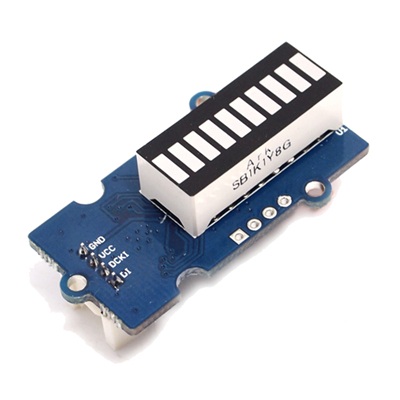
The current exercise uses a solution from Freenove using an off-the-shelf Bargraph and a 74HC595. This clocks an 8 bit number into a 74HC595 thus using 3 pins:
- Data
- Clock
- Latch
This means 3 pins of the Pico are required rather 9 or 10 if the data was sent in parallel. I2C would only be 2 though.
Nb: A 10 segment is illustrated although only 8 (8 bits) are used.
The Arduino shiftout() command performs the shifting of the whole 8 bits of data without further direction:
// Output low level to latchPin
 digitalWrite(latchPin, LOW);
// Send serial data to 74HC595
  shiftOut(dataPin, clockPin, order, data);
// Output high level to latchPin, and 74HC595 will update the data to the parallel output port.
  digitalWrite(latchPin, HIGH);
The latch is disabled and re-enabled immediately before and after this transmission. The Order parameter sets the direction in which the bit are transmitted, lower bits first or higher bits first:
- LSBFIRST
- MSBFIRST
And the display of the shifted bits (one per segment) are only updated after the latch goes high.
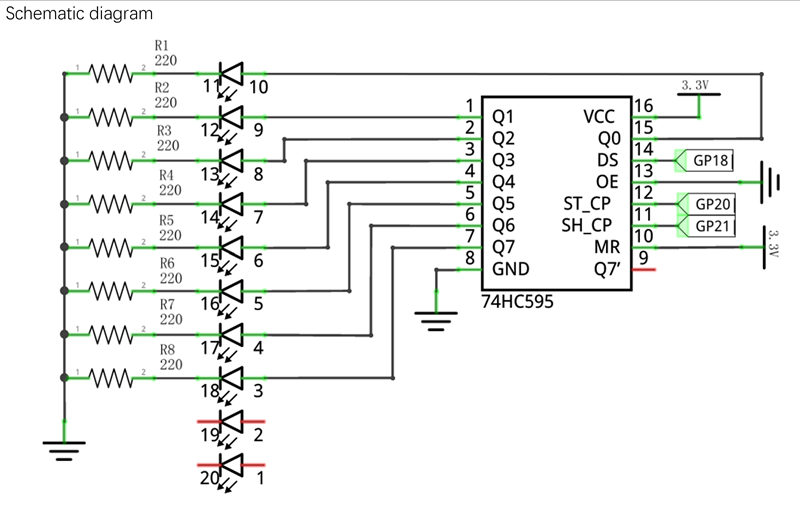
The Bargraph Schematic
Test Arduino Sketch
/**********************************************************************
  Filename    : FlowingLight.ino
  Description : Use 74HC595 to drive the ledbar to display the flowing light.
  Source      : www.freenove.com
**********************************************************************/
int dataPin = 16;   // Pin connected to DS of 74HC595(Pin14)
int latchPin = 20;  // Pin connected to ST_CP of 74HC595(Pin12)
int clockPin = 21;  // Pin connected to SH_CP of 74HC595(Pin11)

void setup() { // set pins to output
  pinMode(latchPin, OUTPUT);
  pinMode(clockPin, OUTPUT);
  pinMode(dataPin, OUTPUT);
}

void loop() {
  // Define a one-byte variable to use the 8 bits to represent the state of 8 LEDs of LED bar graph.
  // This variable is assigned to 0x01, that is binary 00000001, which indicates only one LED light on.
  byte x = 0x01;    // 0b 0000 0001
  for (int j = 0; j < 8; j++) { // Let led light up from right to left
    writeTo595(LSBFIRST, x);
    x <<= 1; // make the variable move one bit to left once, then the bright LED move one step to the left once.
    delay(1000);
  }
  delay(100);
  x = 0x80;       //0b 1000 0000
  for (int j = 0; j < 8; j++) { // Let led light up from left to right
    writeTo595(LSBFIRST, x);
    x >>= 1;
    delay(1000);
  }
  delay(100);
}
void writeTo595(BitOrder order, byte _data ) {
  // Output low level to latchPin
  digitalWrite(latchPin, LOW);
  // Send serial data to 74HC595
  shiftOut(dataPin, clockPin, order, _data);
  // Output high level to latchPin, and 74HC595 will update the data to the parallel output port.
  digitalWrite(latchPin, HIGH);
}
Prototype Hardware
A “prototype” was built on a Breadboard the test the sample sketch and for initial Softata implementation of the Bargraph support:
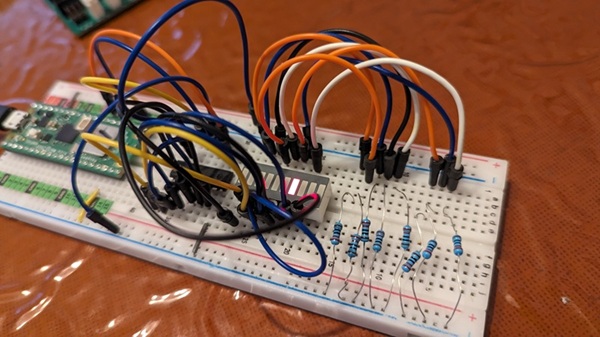
Breadboard Implementation
A bit of a rats nest but it works! A better version coming.
Required Steps
- Create the prototype.
- Run the sketch
Follow up
Using 2 x Grove cables with plug on one end and bare wires connect bare ends to the 3 prototype connection points.
- You can create “bare ends” by cutting a cable in half.
- I prefer to insert male jumper cables thus:
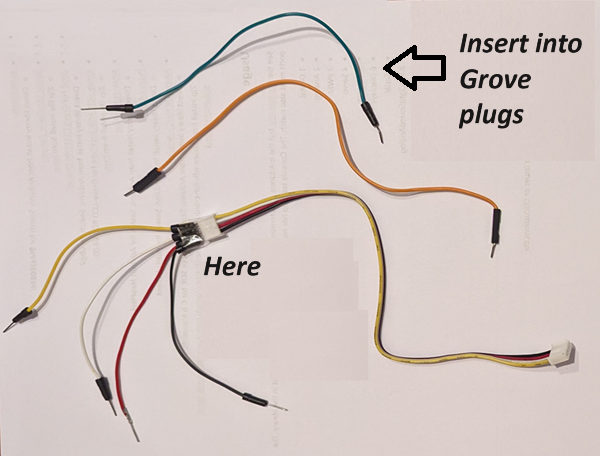
First cable
- Red and black wires to 3,3V and Gnd respectively
- White (to go to GP20) to ST_CP (74HC595 Pin12)
- Yellow (to go GP21) to SH_CP (74HC595 Pin11)
Second cable
Only the white cable needed but power and ground can be connected:
- White (to go to GP16) to DS (74HC595 Pin14)
Connecting to the Grove Pico Shield
- Connect the first cable to the D20 socket.
(The socket bottom right, see below.) - Connect the second cable to the D16 socket.
(The socket 3rd from right at bottom, see below)
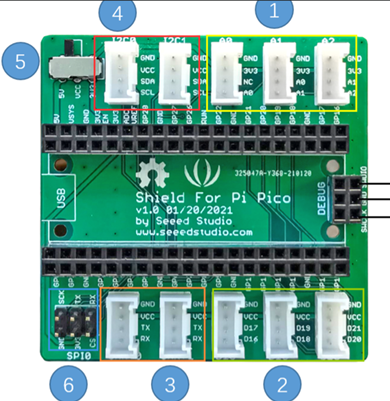
The 3 sockets in section 2 are the GPIO sockets. (D16/17,D18/19,D20/21).
- Section 1 Analog (A0,A1/A0,A2/A1)
- Section 2 I2C (I2C0,I2C1)
- Section 3 Serial (Serial1, Serial2)
Next: Creating a working “shell”, with null functionality, in Softata for a new Display.
| Topic | Subtopic | |
| This Category Links | ||
| Category: | Softata Index: | Softata |
| Next: > | Softata - Adding a new display | 2. The Software Specifications |
| < Prev: | Softata | About (Latest) |


