RPI-Pico-Arduino-AzSDK: Pico W Setup with Arduino
ardpico arduino pi pico iot-hub c sdk-for-c-arduino
Installation of the Arduino Board Support Package on a Pico W including WiFi …
An IoT Hub Device communicates with an IoT Hub in the cloud over the internet and so requires network connectivity. The common Arduino Uno has versions with built in wired networking but the WiFi shield for it is problematic. Many have tried and many have failed (my self included). The Raspberry Pi Pico W version has WiFi built in. A third party Arduino BSP for the Pico W implements the builtin WiFi. Installtion is not a complex matter.

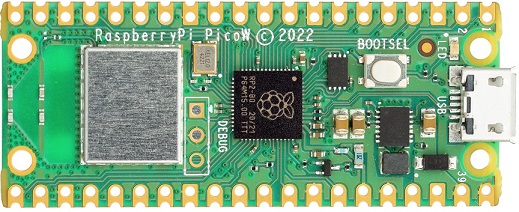
The RPi Pico W
- I came at this from the Freenove Ultimate_Starter Kit for_Raspberry Pi Pico.
- Also see docs for documentation. Look for the PDF in the C folder.
- Using the WiFi capability of the Pico W required the BSP from Earle F. Philhower, III (See below).
Links
- About the Raspberry Pi Pico family
- Azure IoT Hub Arduino Raspberry Pi Pico with Telemetry
- Azure SDK for C Arduino
- Azure Embedded SDK for C
- Raspberry Pi Pico W
- The repository for the Pico W Arduino BSP: earlephilhower-arduino-pico on Github
How to install Arduino BSP onto a RPI Pico
Starting with a RPi Pico W…
- Install the latest Arduino IDE.
- Open Arduino IDE, and click File>Preference. In new pop-up window, find “Additional Boards Manager URLs”, and replace with a new line:
https://github.com/earlephilhower/arduino-pico/releases/download/global/package_rp2040_index.json
- In the IDE click Tools>Board>Boards Manager…on the menu bar
- Enter Pico in the searching box, and select ”Raspberry Pi Pico/RP2040” and click on [Install]
- Click Yes if the pop-up “dpinst-amd64.exe”installation window.
- Starting with the Pico disconnected from computer: Press and keep pressing the white button (BOOTSEL) on Pico, and connect Pico to computer using the USB port before releasing the button. (Note: Be sure to keep pressing the button before powering the Pico, otherwise the firmware will not download successfully.)
- In the Arduino IDE. Click File>Examples>01.Basics>Blink.
- Click Tools>Board>Raspberry Pi RP2040 Boards>Raspberry Pi Pico.
- Click Tools>Port>UF2 Board.
- Upload sketch to Pico.
- LED onboard should flash.
From here on you upload to a specific COM port.
Test WiFi
Wireless
Pico W has an on-board 2.4GHz wireless interface using an Infineon CYW43439. The antenna is an onboard antenna licensed from ABRACON (formerly ProAnt). The wireless interface is connected via SPI to the RP2040.
Station mode
When Pico W selects Station mode, it acts as a WiFi client. It can connect to the router network and communicate with other devices on the router or the internet via the WiFi connection. As an Azure IoT Hub Device, the Pico W runs WiFi in Station mode (cf. Server Mode).
The following sketch starts WiFi and initialises time. Open a new sketch in the Arduino IDE and overwrite with the code:
// Wifi
const char *ssid_Router     = "********"; //Enter the router name
const char *password_Router = "********"; //Enter the router password

// C99 libraries
#include <cstdlib>
#include <stdbool.h>
#include <string.h>
#include <time.h>

#include <WiFi.h>
#include <WiFiClientSecure.h>

#define NTP_SERVERS "pool.ntp.org", "time.nist.gov"

static WiFiClientSecure wifi_client;

static void connectToWiFi()
{
  while(!Serial){}
  Serial.println();
  Serial.print("Connecting to WIFI SSID ");
  Serial.println(ssid_Router);

  WiFi.mode(WIFI_STA);
  WiFi.begin(ssid_Router, password_Router);
  while (WiFi.status() != WL_CONNECTED)
  {
    delay(500);
    Serial.print(".");
  }

  Serial.print("WiFi connected, IP address: ");
  Serial.println(WiFi.localIP());
}

static void initializeTime()
{
  Serial.print("Setting time using SNTP");

  configTime(-5 * 3600, 0, "pool.ntp.org","time.nist.gov");

  time_t now = time(NULL);
  while (now < 1510592825)
  {
    delay(500);
    Serial.print(".");
    now = time(NULL);
  }
  Serial.println("done!");
}

 char* getCurrentLocalTimeString()
{
  time_t now = time(NULL);
  return ctime(&now);
}

static void printCurrentTime()
{
  Serial.print("Current time: ");
  Serial.print(getCurrentLocalTimeString());
}

static void establishConnection()
{
  connectToWiFi();
  initializeTime();
}


void setup()
{
  Serial.begin(115200);

  pinMode(LED_BUILTIN, OUTPUT);
  digitalWrite(LED_BUILTIN, true);

  while(!Serial){}
  establishConnection();

  digitalWrite(LED_BUILTIN, LOW);
}

void loop()
{
  printCurrentTime();
  delay(3333);
}
Typical output:
............WiFi connected, IP address: 192.168.0.2
Setting time using SNTP........done!
Current time: Tue Feb 14 01:22:44 2023
Current time: Tue Feb 14 01:22:48 2023
Current time: Tue Feb 14 01:22:51 2023
| Topic | Subtopic | |
| This Category Links | ||
| Category: | Pico W AzSDK Index: | Pico W AzSDK |
| Next: > | RPI-Pico-Arduino-AzSDK | Azure SDK for C Arduino Setup |
| < Prev: | RPI-Pico-Arduino-AzSDK | Get Connection Strings ... Scripts |


